A drip campaign works best when I keep it simple: one goal, one audience, one trigger, and a short series of emails tied to what the contact just did. That matters because behavior-based email flows can drive 18x more revenue than batch sends, and cart emails can bring in almost $7 per message.
If I want a drip workflow that performs, I need to:
- pick one conversion goal
- segment the right people
- set clear entry and exit rules
- map the sequence before building it
- space emails based on intent
- test each step before launch
- track opens, clicks, conversions, and unsubscribes
- follow CAN-SPAM rules with an unsubscribe link and business address in every email
A simple way to think about it: if the message matches the funnel stage, timing, and user action, the workflow has a much better shot at getting clicks and conversions.
Below, I’ll walk through the full process in a clear, step-by-step way.
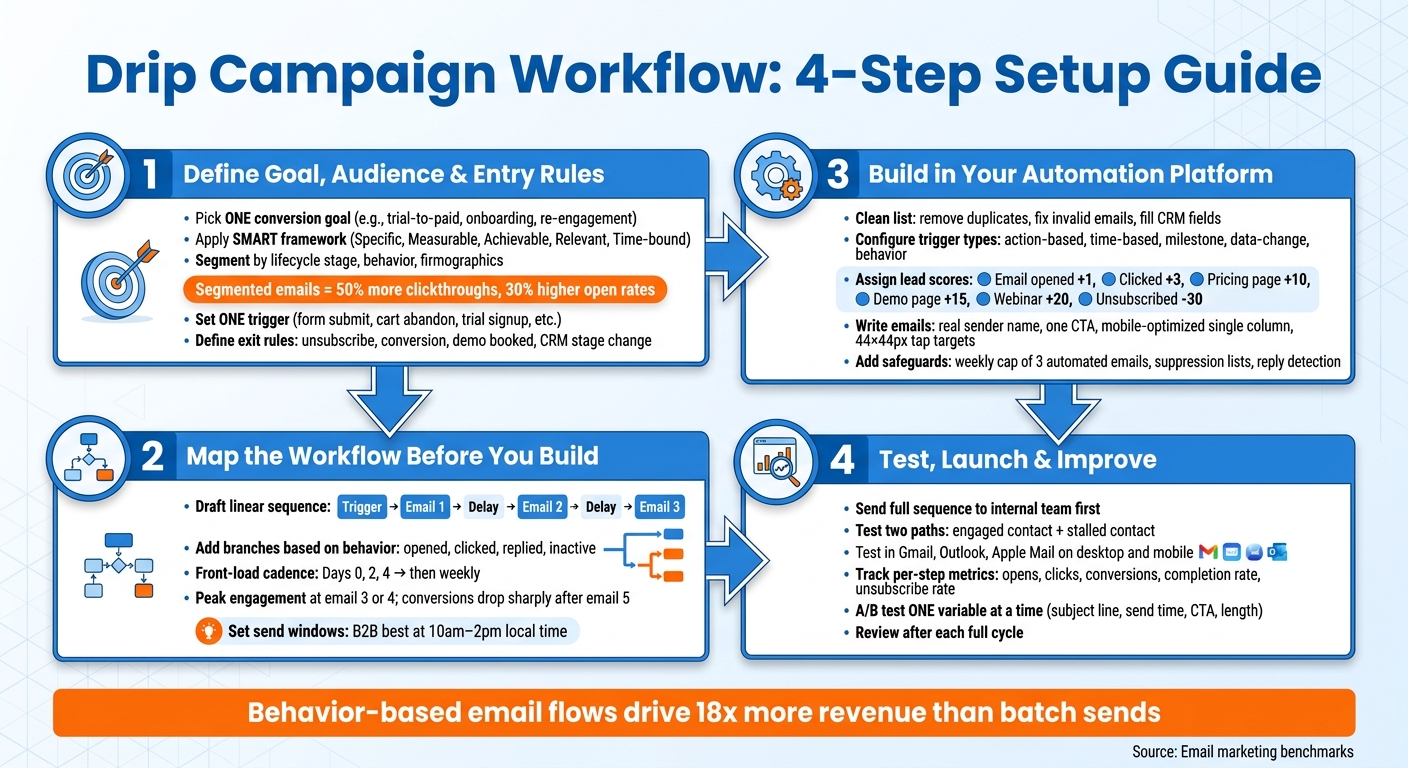
Drip Campaign Workflow: 4-Step Setup Guide
How to Do Drip Email Marketing in HubSpot (Easy Step-by-Step Guide!)
sbb-itb-a84ebc4
Step 1: Define the Goal, Audience, and Entry Rules
Once you've picked the funnel stage, set the workflow's goal, audience, and rules. Start with three choices: the goal, the audience, and the entry and exit rules.
Choose One Primary Conversion Goal
Give each workflow one main goal. That means one CTA per workflow and one KPI per email.
Common goals include:
- onboarding completion
- demo booking
- trial-to-paid conversion
- repeat purchase
- reactivating an inactive user
Once the goal is set, run it through the SMART framework. It should be Specific, Measurable, Achievable, Relevant, and Time-bound. For example, "Increase trial-to-paid conversion from 12% to 18% within 60 days" is a goal you can measure and improve.
Segment Contacts Using the Right Data Fields
Segmentation isn't just a nice extra. It has a direct effect on performance. Segmented emails drive 50% more clickthroughs and 30% higher open rates than unsegmented sends.
Use data fields that make it clear who should be in the workflow. Segment by lifecycle stage, persona, behavior, and firmographics. For U.S. send timing, add state, ZIP code, and time zone.
Dynamic segments help a lot here. They update on their own, so you don't have to keep pulling lists by hand. For example, "Enterprise prospects in trial - company size 1,000+ employees, trial started in the last 7 days" will keep matching the right contacts as data changes.
After that, enroll only the contacts who match the workflow's trigger.
Set Triggers and Exit Conditions
Use one trigger tied to an action or behavior. That could be a form submission, content download, trial signup, webinar registration, abandoned cart, or pricing page visits 3+ times.
Time-based triggers can work just as well, especially for win-back flows. A simple rule like 30 days since last login is often a good fit for re-engagement sequences.
Exit rules matter just as much as entry triggers. End the workflow when a contact unsubscribes, converts, books a demo, replies, or changes CRM stage. Also use suppression lists to keep current customers and active sales contacts out of the workflow.
Once those rules are in place, you can map the sequence and branch logic.
Step 2: Map the Workflow Before You Build It
Once the goal, audience, and entry rules are in place, map the workflow before you touch the platform. A quick sketch on paper or in a all-in-one marketing tool can save you a headache later. It helps you catch the usual problems early: overlapping messages, missing branches, and contacts that get stuck with no clear way out.
Draft the Sequence and Branch Logic
Start simple with a linear sequence: entry trigger → email 1 → delay → email 2 → delay → email 3.
That first draft doesn't need bells and whistles. Just write down what each email is supposed to do and what action you want the contact to take. Then, once the core path makes sense, layer in branches.
Each branch should come from a clear behavior: opened, clicked, replied, or went inactive. For every branch, decide where it ends. Engaged contacts move forward into the next path. Inactive contacts should either exit or go into a re-engagement path. No one should be left wandering around the workflow.
After the path is mapped, lock in the cadence so the timing fits the contact's stage. Then add suppression rules and a weekly frequency cap.
Set Cadence, Duration, and Send Windows
One of the most common mistakes is giving every email the same spacing. That sounds neat on paper, but it often misses how people act. Instead, front-load your sequence. Send the first two or three emails closer together - Days 0, 2, and 4 - when interest is usually at its highest. After that, stretch the gaps to weekly as the sequence moves along.
Why does this matter? Because engagement and conversion usually peak around the 3rd or 4th email. If a contact still hasn't acted by email 5, the odds of conversion tend to fall fast.
For U.S. campaigns, send based on the recipient's local time zone. In B2B, 10 a.m.–2 p.m. local time tends to work best.
Use this table as a starting point:
| Workflow Type | Typical Touches | Total Duration | Main Advantage | Tradeoff |
|---|---|---|---|---|
| B2B Lead Nurture | 8–15+ | 30–90 days | Builds authority for complex sales cycles | Requires high volume of quality content |
| Onboarding | 3–7 | 14–30 days | Reduces friction and accelerates time-to-value | Can overwhelm new users if too frequent |
| Cart Recovery | 2–3 | 1–3 days | Recovers high-intent revenue quickly | Very narrow window of relevance |
| Win-Back / Re-engagement | 3 | 30–60 days | Identifies and removes disengaged leads | Generally low response rates |
| Welcome Series | 5–7 | 14 days | Highest engagement window for new leads | High unsubscribe risk if over-pitched |
With the map in place, you're ready to move into the platform build.
Step 3: Build the Workflow in Your Automation Platform
Now build the workflow inside your automation platform, using your map as the guide. Start with the data fields the workflow relies on. If the inputs are messy, the workflow falls apart fast.
Prepare Lists, Fields, and Workflow Logic
First, clean the list. Remove duplicates, fix invalid email addresses, and check that the CRM fields your workflow needs are filled in: lifecycle stage, lead score, plan level, and company size. If those fields are missing, routing and scoring can fail.
Next, set each trigger with a matching exit rule. For example, if a contact books a demo, that person should leave the nurture sequence right away. Common trigger types include:
- Action-based triggers, like form submissions
- Time-based triggers, like a set date
- Milestone-based triggers, like trial start
- Data-change triggers, like lead score updates
- Behavior-based triggers, like pricing page visits
Once the trigger is live, define what each action does to the contact's path. Then assign lead score points so the system can move contacts on its own.
| Action | Lead Score Points |
|---|---|
| Email opened | +1 |
| Email clicked | +3 |
| Pricing page visited | +10 |
| Demo/trial page visited | +15 |
| Webinar attended | +20 |
| Email unsubscribed | -30 |
| No activity (30 days) | -10 (decay) |
When a contact hits the sales-handoff threshold, notify a rep and unenroll the contact on its own.
(Source:)
Write Emails and Add Safeguards
Once the logic is in place, write each email to fit its branch. Each message should have a real sender name, a subject line with one clear point, body copy built around one CTA, a personalization token with a fallback value, and a layout that works well on mobile. Most emails are opened on phones, so keep the design to a single column and use 44×44-pixel tap targets.
For high-value sequences, add a plain-text version along with the HTML version to help with deliverability. Use a monitored address and a real person's name instead of a no-reply sender. That small change can make the whole thing feel more human.
Personalize by industry, role, and lifecycle stage so the email fits the reader's situation. A message to a first-time lead shouldn't sound like a message to someone deep in a trial.
Then put guardrails in place. Set a weekly cap of three automated emails. Add suppression lists for people already in a higher-priority campaign or dealing with an open support ticket. Also turn on reply detection so the drip pauses when a subscriber writes back.
Find Implementation Resources on Marketing Funnels Directory
Use the Marketing Funnels Directory to find tools, vendors, courses, and books for funnel setup.
Step 4: Test, Launch, and Improve the Workflow
Now that the workflow is built and the safeguards are in place, don't send real contacts into it just yet. First, make sure the whole thing works from start to finish.
Run Pre-Launch Checks and Internal Tests
Start by sending the full sequence to people on your team. Go through it like a subscriber would. Check every merge field, make sure dynamic content blocks show up for the right segment, and confirm that no broken code appears where a first name should be.
Then click every link. Each one should land on the right page. Make sure the unsubscribe link works. And if someone converts, the exit condition should remove that contact right away.
It's also smart to test at least two paths:
- An engaged contact
- A stalled contact
Branch logic can look fine on paper and still break once someone hits an edge case.
Before launch, test the workflow in Gmail, Outlook, and Apple Mail on both desktop and mobile.
Once the sequence clears internal testing, turn to live performance data to spot the weakest step.
Track Metrics and Diagnose Bottlenecks
Look at step-level metrics, not just top-line numbers for the whole sequence. You want to see where contacts slow down or drop off.
A sharp drop between emails usually points to a subject line or timing issue. High opens with low clicks often mean the email copy or CTA isn't doing its job. Strong clicks with weak conversions usually shift the problem to the landing page.
Also watch the sequence completion rate, which is the share of contacts who make it through every email in the series. If that rate is low, the workflow may be too long, or the exits may be firing too soon.
Track these metrics at each step:
- Opens
- Clicks
- Conversions
- Completion rate
- Unsubscribe rate
Once you find the bottleneck, change only one thing at a time.
Improve Results with A/B Tests and Workflow Updates
When a step underperforms, test a single variable. That could be the subject line, send time, CTA placement, or message length. If you test two things at once, you won't know what caused the result.
After you find a winner, update that branch and let it run through another full cycle before you test the next element.
Review the workflow after each full cycle. Then test one variable at a time.
The basic rules don't change: set one goal, segment with care, map the sequence before you start building funnels, add safeguards, and use performance data to guide each update.
FAQs
How many emails should a drip campaign include?
There’s no one “perfect” number, but many strong drip campaigns land in the 4 to 7 email range sent over 1 to 2 weeks.
For B2B, email sequences often run 3 to 7 emails. If the buying cycle is longer and people need more time to weigh their options, that can stretch to 8 to 15 emails or more.
What is the best trigger for a drip workflow?
The best trigger is a specific user action, not a fixed schedule.
Why? Because user actions show clear intent. That makes your messages more timely and more relevant.
A few common examples:
- Signing up for a trial
- Downloading content
- Abandoning a shopping cart
- Visiting a pricing page
How often should I update a drip campaign?
Update a drip campaign based on performance data, not guesswork. Watch metrics like open rates, click-through rates, and conversions to spot when the content or send timing needs work.
If the data shows shifts in the customer journey - like a longer or shorter time-to-purchase, or changes in feature adoption - adjust the sequence to match. Regular audits help keep the messaging relevant and effective.